FREE! An Email Newsletter Using ASP Smart Mailer and Advanced HTML Editor Support
Take a look at Matt Machell's latest tutorial where he describes how you can use Dreamweaver MX 2004 along with the DMXZone ASP Smart Mailer and Advanced HTML Editor extensions to produce a straightforward mailing list and newsletter application.
Well if you're in that situation, take a look at Matt Machell's latest tutorial where he describes how you can use Dreamweaver MX 2004 along with the DMXZone ASP Smart Mailer and Advanced HTML Editor extensions to produce a straightforward mailing list and newsletter application.
![]()
![]()
![]()
![]()
![]()
Mailshot Preview Page
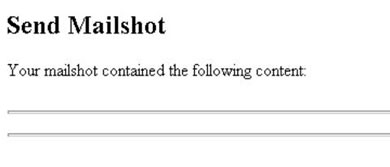
mailshot_send.asp is designed to give a preview of your page, so your users can be sure they haven't got any spelling mistakes. Open up the page and add a title, some explanatory text and two horizontal rules. We'll use these to show where the newsletter content begins and ends.
 |
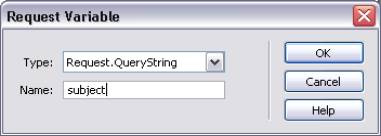
Next go to the Bindings area of the Application panel and add two request.querystring variables, content and subject:
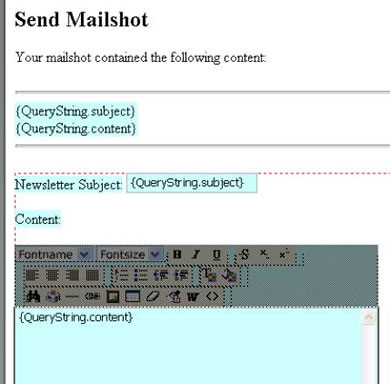
With these added, drag them into the area between the two horizontal rules and put a break between them (<br /> tag).
Add a form underneath the rules – this form is essentially a duplicate of the previous page's form, so that the user can correct any mistakes they notice in the preview. The only difference is that this form uses POST, and that we've used the dynamic bindings subject and content as default values (you can set these up using the lightning bolt icon in the Properties panel, when either of the form elements is selected).
Why go to this extra trouble of previewing? Well, it's better than having a newsletter full of spelling mistakes going out, and the preview will allow you to see the entire thing rather than just the editor window. It also allows you to wrap any default formatting you add to your email (see later) around the dynamic sections.
The page will now look like the one below in Dreamweaver:
Now that we have our newsletter preview, it's time to gather the information used to actually send the newsletter. The newsletter is sent by posting back to the same page, so we have to get the relevant information here.
We're going to add a recordset. Go to the Server Behaviors area of the Application panel. Hit + > Recordset (Query), and the dialog below will open up, we'll use the simple mode since all we want is the details:
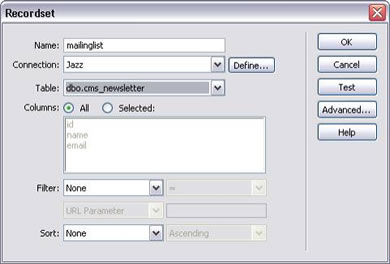
We've called the recordset mailinglist and simply grabbed everything from the table. If you hit Test you should get all the email addresses you added when testing the sign up part of the application.
Hit OK to close the dialog.
Still in the Server Behaviors panel Hit + > DMXZone > Smartmailer.
The first panel of the Smart Mailer extension should look like this:
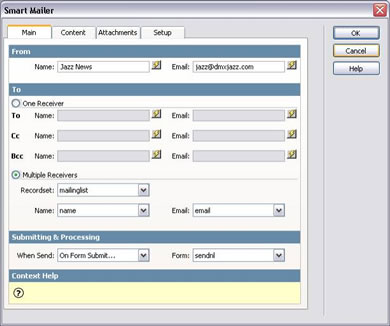
The From section will need to be filled out with something appropriate to your site. Set the To area to be Multiple Receivers and use the mailinglist recordset. Make sure the database columns for name and email are matched correctly. Set the mailer to go off On Form Submit.
Moving on to the content panel of the Smart Mailer extension:
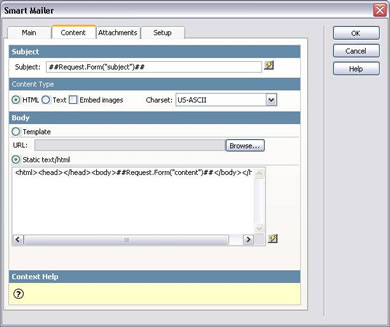
Set the subject to take its value from the hidden form element subject. You could use a binding, or just type in the ##Request.Form("subject")##.
We've set content-type to HTML. If you plan on using images in your newsletter, you may wish to set Embed images, so that people can view the newsletter without being online. However, bear in mind that this will increase the size of the email quite drastically with a corresponding increase in time taken to send to every recipient. Generally linked images are a better choice if sending large amounts of mail.
I've used a very simple piece of HTML for the email, but you can include a much more elaborate template depending on your tastes. If you do, remember to include this template information on your preview page. I've also added a link to our unsubscribe page.
<html>
<head>
</head>
<body>##Request.Form("content")##
<p>You are subscribed to the DMXJazz Newsletter unsubscribe at:
<a href="http://www.dmxjazz.com/mailshot_remove.asp?email=##Server.URLEncode(mailinglist.Fields.Item("email").Value)##">
http://www.dmxjazz.com/mailshot_remove.asp?email=##Server.URLEncode(mailinglist.Fields.Item("email").Value)##
</a>
</p>
</body>
</html>
Again, you could create a binding for our request variables, but it's just as easy to type in the Request variable for the content. Remember to put everything on one line, or Smart Mailer will add extra <br> tags.
Before we leave this code, consider the unsubscribe link:
http://www.dmxjazz.com/mailshot_remove.asp?email=##Server.URLEncode(mailinglist.Fields.Item("email").Value)
We've included this as both an URL and as text, so that anybody who has their email client set to plain text can still have a link to copy and paste. We've also used the ASP Server.URLEncode method to turn any special characters in the email into appropriate URL code (@ becomes %40, dots become %2E).
Finally, move to the setup dialog:
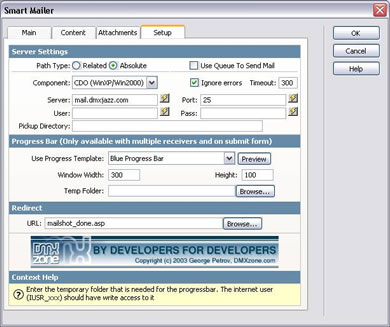
The Server Settings area will need to be configured, since installations of ASP Server's vary in what email services they provide.
Path Type lets the extension know how to include the dependent file that actually runs the emailing procedure. You should be okay with Related, unless your server has parent directories disabled (you can't use ../).
The Component box is the most important as it tells the script which one is present on your server – if you're using a web hosting company, check with them which email service is provided.
Typically, NT and older Windows 2000 hosting uses CDONTs (Collaboration Data Objects for Windows NT Server) and newer Windows 2000/2003/XP servers will use CDO (Collaboration Data Objects). Some providers use Jmail, ASPMail and ASPEmail, for whatever reasons.
Once you know which type of email service is installed, it's simply a matter of filling in the boxes correctly. For most this is just a case of adding in the mail server you wish to use (which will likely be something like mail.yoursite.com). Some will have a different name, others will be secure and require an email account, username and password before they'll send anything.
You'll also want to set up whether to ignore errors or report them to the user when sending mail. For this application I've set it to ignore.
For sending bulk email you'll also want to increase the script Timeout so that the script doesn't stop running automatically (a failsafe built into ASP pages to stop infinite loops and other nastiness clogging up server time). How much you increase it by will depend on how many subscribers you have and the capacity of your server. For a few hundred subscribers between 300-600 is probably okay. As a good rule of thumb, every time your subscriber base doubles, double the script timeout.
For large number of subscribers, it's also useful to have a progress bar, so that the user (if they're not you) knows how far through the mailing they are. Smart Mailer provides some nice Flash based progress bars that appear in a popup when you click submit and stay until the confirmation page appears. Remember to upload the HTML and SWF with your other files.
Finally choose a redirect page. In this case it's mailshot_done.asp. And close the dialog.
Before moving on, we need to secure this page. In the Server Behaviors dialog hit + > User Authentication > Restrict Access to Page. A dialog like the one below will appear:
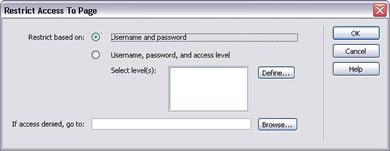
We'll just restrict on Username and password, set the access denied page to be mailshot_login.asp. Click OK and save the page.
![]()
![]()
![]()
![]()
![]()
Matt Machell
 A man of many talents, Matt has been a web designer, technical editor, and jewellery picker. He is currently on contract for the Birmingham City University, producing pages for research centres.
He has tech-edited a dozen books on web design and development for glasshaus, Apress and Sitepoint.
He likes music with loud guitars and games with obscure rules.
His website can be found at: http://www.eclecticdreams.com
He lives in Birmingham with his girlfriend, Frances, and a horde of spider plants.