FREE! An Email Newsletter Using ASP Smart Mailer and Advanced HTML Editor Support
Take a look at Matt Machell's latest tutorial where he describes how you can use Dreamweaver MX 2004 along with the DMXZone ASP Smart Mailer and Advanced HTML Editor extensions to produce a straightforward mailing list and newsletter application.
Well if you're in that situation, take a look at Matt Machell's latest tutorial where he describes how you can use Dreamweaver MX 2004 along with the DMXZone ASP Smart Mailer and Advanced HTML Editor extensions to produce a straightforward mailing list and newsletter application.
![]()
![]()
![]()
![]()
![]()
Building the Users Pages
Here we need to look at the sign up (mailshot_signup.asp) and unsubscription (mailshot_remove.asp) pages and the two confirmation pages (mailshot_confirm.asp and mailshot_unsub_confirm.asp).
The Sign Up Page
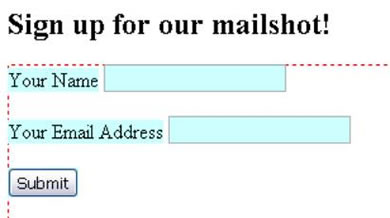
Users sign up to our newsletter via mailshot_signup.asp. Open up the file and add a basic form with two fields (name and email) and a submit button:
 |
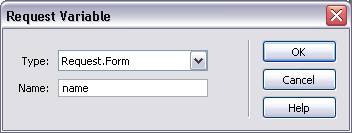
In the Bindings panel, add bindings to request.form and name, and request.form and email.
Moving to the Server Behaviors area of the application panel, click + > Insert Record. A dialog like the one below should open up:

Select the connection you are using, and the cms_newsletter table. Set the behavior to use the values from our form. If you use different column names to textfield names, make sure they match to the correct ones.
When you browse for the After inserting go to: page, select mailshot_confirm.asp, and click the Parameters button. In the Parameters box add one called name, with a value of the binding request.form name. Do the same for one called email and request.form email.
Click OK and go back to the page. With the first page complete, we move on to the mailshot_confirm.asp page.
The Confirmation Page
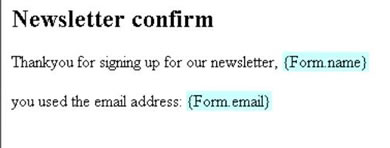
Create a basic page with a confirmation message: "Thankyou for signing up to our newsletter"
Using the bindings panel, bind two request variables name and email, using Bindings > + > Request Variables and using the Request.Form option.
Drag these bindings onto the page so that we can create a more personal message:
The sign up area is now finished. At this stage, you'll want to test the pages and add a few dummy email addresses to the database for test purposes by submitting the sign up form. Something like dummy@yoursite.com, so you can track if it arrived okay and what the result looks like.
The Removal Page
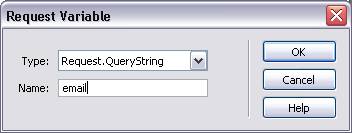
In our email we give our users the option to unsubscribe, by clicking on a link containing their address. Open up mailshot_remove.asp and move to the Bindings panel. Add a binding for a request.querysting variable called email, as provided in our link.
Next, add a title and some suitable text to the page, and then drag the binding you just created into the text. It should look something like this:

Now create another binding of the type Request.Form to email, since we need to keep track of it when we post back to the page.
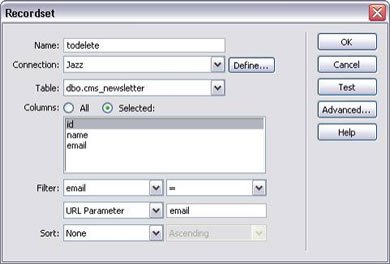
Again in the Bindings panel create a new Recordset called todelete. Set the dialog to select the id of the subscriber from the database with the same email address. We only need the ID as this is used by the Delete server behavior.
With the recordset created, add a form below the text, containing a single button labelled "Delete Me" and containing a hidden element called email with a dynamic value set to the Binding Request.Querystring of the same name.
Move to the Server Behaviors panel and Click + > Delete Record. The dialog shown below will appear, and you will need to add the details shown:
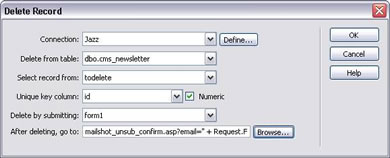
Again we use our Jazz connection and the cms_newsletter table. The record to delete comes from our todelete Recordset and the unique key is our id field. The page the users see after deletion is mailshot_unsub_confirm.asp. When you browse for this in the file dialog, hit the parameters button to add the details below.
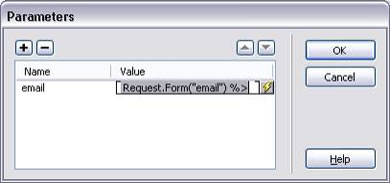
This way, even when we forward to the confirmation page we keep track of the email that was deleted as part of the URL.
![]()
![]()
![]()
![]()
![]()
Matt Machell
 A man of many talents, Matt has been a web designer, technical editor, and jewellery picker. He is currently on contract for the Birmingham City University, producing pages for research centres.
He has tech-edited a dozen books on web design and development for glasshaus, Apress and Sitepoint.
He likes music with loud guitars and games with obscure rules.
His website can be found at: http://www.eclecticdreams.com
He lives in Birmingham with his girlfriend, Frances, and a horde of spider plants.