Premium Content


Premium Content articles are the very best articles from the world's leading internet technology, subject-matter experts. We have many categories of content below on a wide variety of subjects that have all been commissioned from big name authors.

Explore the Premium Content

Flash 8 Image Uploader

Introduction

Flash 8 has arrived on the scene with a rich array of long-awaited additions.
In this article we will be covering one of them – the File Upload feature.
We won’t be spending much of our time on theory, which you can learn by going through Flash Help.
Instead we will focus on the practical application by building a full-featured image uploader.

Features of the application include:

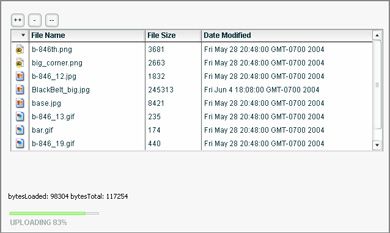
  • Upload list management: adding and remove collections of items in a datagrid with all the file relevant information.
  • Limit not only file types but also the collection’s total file size – a user will not be able to start uploading if it exceeds the limit. Once the list is compiled the user will click the Upload button to initiate the procedure.
  • During the procedure the user will be able to monitor the progress (represented by the progress bar). The user will also be notified about the upload status and errors:

    A one line of PHP code will handle the upload on the back end.

Read More

Ajax Part 2: The Ajax Filmstrip

Last week we saw the very basics of Ajax, we’ve learned to make asynchronous requests to the web server, thus freeing us from reloading a web page. This allows us to have much more of an “application like” feel to our web pages – or web application pages.

Last week we simply verified a username and presented a message to the user. Nice and useful, but not extremely exciting. What if we wanted to deal with images? Adding images to the ballgame opens our creative minds and gets the juices flowing! Furthermore, we’d like to think in a slightly more object oriented way than just stacking up loads of functions to do our dirty work. Pretty soon we’ll find we’ve added new functionality but also tons of overhead to our pages. We want to avoid that.

For this lesson we’re going to build a very basic (and I mean basic) version of the Windows “Filmstrip” functionality.

Read More

Building a bar chart in Flash, part 1

I get a lot of queries from people about how to create charts in Flash. Flash MX shipped with some chart components and there are a number of commercial products available that can help you make charts. However, if you need to make a simple chart, you can quite easily write your own. That’s the topic for this tutorial.

In this tutorial, I’ll show you how to create your own reusable BarChart class. We’ll draw the axes and bars with the drawing API. We’ll allow users of the class to create it with default values and labels or set their own. We’ll also allow people to add their own title and bar colour. If you’re not familiar with the drawing API, I won’t cover it in detail here so if you need a refresher, check out the Drawing with Flash article.

Note: If you have difficulties downloading the source files or PDF, you might have a problem with your cookies. Delete the cookies from your machine and try again. In Internet Explorer, you can do this by choosing Tools > Internet Options… and clicking the Delete Cookies… button on the General tab.

Read More

Scripting blend modes

Flash Professional 8 includes a range of blend modes similar to those in Fireworks or Photoshop. Blends allow you to change the colour of overlapping objects to achieve different visual effects. The resulting colour depends on the colours of the objects and the blend mode you choose.

Flash Professional 8 includes the following blend modes: Normal, Layer, Darken, Multiply, Lighten, Screen, Overlay, Hard light, Add, Subtract, Difference, Invert, Alpha and Erase. In this article, you’ll find out more about these blend modes and learn how to work with them in ActionScript.

You’ll need a copy of Flash Professional 8 to see the features covered in this article. You can download a trial copy from the Macromedia Web site. You should also install Flash Player 8. Because the article includes changes to ActionScript, you can’t publish the code to Flash Player 7 and earlier. Note that the code samples within the article all use AS2.0.

You can download the files referred to in the tutorial from the blue Properties box that contains the article PDF. There's a heading titled Code Download and you can click the Details link next to it to get the zip file.

Note: If you have difficulties downloading the source files or PDF, you might have a problem with your cookies. Delete the cookies from your machine and try again. In Internet Explorer, you can do this by choosing Tools > Internet Options… and clicking the Delete Cookies… button on the General tab.

This article is part of the new interactive e-book; Out of my mind: Flash 8 Power

Let’s get started by looking at what each blend mode does.

Read More

Dreamweaver 8: Applications

During the first two-thirds of this intensive look at the new and improved Dreamweaver 8, we have looked at the tool and its new features, we have explored the CSS-ability of the new version and now it is time to look at Dreamweaver 8 as an Application builder. 

Our last version, Dreamweaver MX 2004, was rightfully dubbed the “CSS edition” but that was a good thing because CSS to that point in time we sadly lacking and most serious developers turned to a 3rd party tool to create their CSS and then just attached it to Dreamweaver.  The MX 2004 version made great strides in this respect, but it did not replace the 3rd party tool in every respect.  It is my opinion that Dreamweaver 8 does so.  So we were right in giving a fair amount of attention to CSS in this version as well.

This article is part of the new interactive e-book; Dreamweaver Crystal Gazer: The Power Of Dreamweaver 8

Read More

Creating a ColdFusion components in Dreamweaver

One of the questions that we hear a lot is, “How do I use CFC’s? Everybody talks about it, but how does it work?”

This tutorial contains a movie on how to create ColdFusion components by using the CFC panel in Dreamweaver. Michael van Leest explains how to do this in the “Object Orientated” way.

First Michael creates a CFC with Dreamweaver and modifies it so it contains 3 methods (functions):

  1. getGreeting
  2. setName
  3. setGreeting

The component will also contain 2 variables that can be used and manipulated by all 3 functions.

Read More

Scripting filters, part 2

In part one of the Scripting filters in Flash Professional 8 series, I showed you how to use ActionScript to work with filters. We covered how to add, modify and delete filters. I also covered the Bevel and Blur filters in detail and gave you an example of how to use each one.

In this article, I want to cover the remaining filters included in Flash Professional 8.  We’ll look at the following filters.

  • ColorMatrix
  • Convolution
  • DisplacementMap
  • DropShadow
  • Glow
  • Gradient Glow
  • Gradient Bevel

We’ll see examples of how to work with these filters. We’ll work through a couple of examples so you can see some uses. You’ll need a copy of Flash Professional 8 and Flash Player 8 to work through this article. You can download a trial copy from the Macromedia Web site. Note that the code samples within the article all use AS2.0.

You can download the files referred to in the tutorial from the blue Properties box that contains the article PDF. There's a heading titled Code Download and you can click the Details link next to it to get the zip file.

Note: If you have difficulties downloading the source files or PDF, you might have a problem with your cookies. Delete the cookies from your machine and try again. In Internet Explorer, you can do this by choosing Tools > Internet Options… and clicking the Delete Cookies… button on the General tab.

We’ll start by looking at the ActionScript only filters - the ColorMatrix, Convolution and DisplacementMap filters. These are advanced filters that contain complicated calculations.

This article is part of the new interactive e-book; Out of my mind: Flash 8 Power

Read More

Dreamweaver 8: Buried in the Basement

Part 10, “Buried in the Basement” was written because it had to be.  It is the one departure from the theme of this series, or rather, I should say “semi-departure”.  Not everything discussed in this article is new with Dreamweaver 8, but I felt it was important to do a chapter like this if for no other reason than to invoke user awareness.

The Results Panel, or “basement” as I like to call it, is by some standards, “boring” because it doesn’t design, it doesn’t create the pages and so it lies down there under the Property Inspector, largely unnoticed and massively underutilized.  But it contains within its tabs a series of very powerful utilities designed to help you find problems, validate pages, look for errors, batch process word replacement and print a stack of reports that I promise you, once you use a couple of times, you will not do without in the future. 

This article is part of the new interactive e-book; Dreamweaver Crystal Gazer: The Power Of Dreamweaver 8

Read More

Introduction to AJAX

In the last six months there has been a lot of talk (read “hype”) about something people are calling “Web 2.0.” What they mean when they throw these buzzwords around is that there are some exciting new technologies that will transform the Internet into something we hoped it would be the first time around.

Whether or not this turns out to be true, the fact is that there are some interesting things being done with technology these days, and lucky for us – they include JavaScript! One of the foremost technologies being bandied about is something called AJAX, which is an acronym for “Asynchronous JavaScript + XML,” and it actually isn’t all that new. What is new is the way it is being used and the technologies with which it is being paired.

AJAX as a catchphrase was coined by Jesse James Garrett of Adaptive Path. With a company called 37 Signals, they have made some early use to bring these techniques to the forefront in the web development world. You can read a longer introduction to the concept written by Garrett himself if you like, but we will focus on the basics as an introduction coupled with JavaScript.

Read More

Creating Buttons and Tabbed Interfaces in Photoshop

The State of the Button

Hyperlinks are the glue that holds the web together. Without an easy way to navigate from page to page, we would never find all the useful information on the internet. Of course, blue underlined hyperlinks don’t give your site much flexibility. That’s where buttons come in. Buttons have been around on the web for about as long as Mosaic brought graphical browsing to the masses back in the early ‘90s. The styles and colors have changed over the years; from simple flat color buttons to colorful glossy buttons, we’ve seen it all. There now seems to be a fairly even split between approaches to buttons in web interfaces. On one side are the minimalist buttons that just give a hint that they’re clickable, often with no graphics in sight. At the other end are buttons that take their job seriously and use various graphical tricks to make their ‘clickability’ obvious.

Advertisement Fish Eye Menu

Do you want to create fantastic interactive menus with a Mac OS X toolbar look? Use FishEye menu for your website buttons. Make galleries, portfolio's, menu's or anything else where you need a cool navigation. All without Flash, pure JavaScript and CSS. Use effects that will make your eyes pop out! Choose from one of the many predefined styles or create your own, there will always be a menu that suits your needs!


This article discusses the most prominent styles and how you can create them in Photoshop and Dreamweaver. Along the way, I’ll give you numerous examples and additional resources. Let’s get started…

Read More

Dreamweaver 8: In A Flash

This is the first article not about CSS that I’ve written in some time.  The CSS was good, but we don’t really want you to think that Dreamweaver 8 is all about the CSS and nothing else.  There is plenty more packed into this release so we’re moving along to show you some more things you can do with this beast.

This article is part of the new interactive e-book; Dreamweaver Crystal Gazer: The Power Of Dreamweaver 8

Read More

Scripting Filters, part 1

If you’ve been reading the articles about the new features in Flash 8, you’ll know that Flash Professional 8 includes a range of filters that allow you to add special effects to objects on the Stage. In an earlier article, I showed you how to apply the following filters using the Flash interface:

  • Bevel
  • Blur
  • DropShadow
  • Glow
  • Gradient Glow
  • Gradient Bevel

You can also use ActionScript to work with these filters. In addition, you get to work with the extra filters listed below when you use ActionScript:

  • Convolution
  • ColorMatrix
  • DisplacementMap

This article is part of the new interactive e-book; Out of my mind: Flash 8 Power

These are more advanced filters than the first group and involve complicated calculations. I’ll give you information about them but you might want to start scripting with the other filters in ActionScript first.

In this article, I’ll start by covering some background about how to work with filters in ActionScript. We’ll look at the Bevel and Blur filters and create a motion effect. In the next article, I’ll look at the other filters and we’ll create a small application that allows you to adjust a Drop Shadow filter dynamically.

You’ll need a copy of Flash Professional 8 to see the features covered in this article. You can download a trial copy from the Macromedia Web site. You should also install Flash Player 8. Note that the code samples within the article all use AS2.0.

You can download the files referred to in the tutorial from the blue Properties box that contains the article PDF. There's a heading titled Code Download and you can click the Details link next to it to get the zip file.

Note: If you have difficulties downloading the source files or PDF, you might have a problem with your cookies. Delete the cookies from your machine and try again. In Internet Explorer, you can do this by choosing Tools > Internet Options… and clicking the Delete Cookies… button on the General tab.

Read More
Newer articles Older articles