Explore the Premium Content

Flash 8 – ActionScript and JavaScript communication

In previous versions of Flash, getting ActionScript and JavaScript to communicate was a big effort. You could use getURL and fscommand to call a JavaScript function from within a Flash movie. If you’ve ever worked with fscommand, you’ll know that creating this type of communication can be pretty hard going.

Flash 8 includes a brand new way to communicate called the ExternalInterface class or the External API. The External API allows a Flash movie to communicate with a Web browser or any other container that plays the Flash movie. Not only can your Flash movie communicate with JavaScript, but you can also call a C#, VB.NET or Python function in a desktop application. The only drawback is that you have to target Flash Player 8 to be able to use this functionality.

In this tutorial, we’ll set up a simple two-way communication between Flash and a form on a Web page. You’ll be able to enter details in Flash, and transfer them to a form on a Web page. You’ll also be able to enter details in the Web form and transfer them through to Flash.

You’ll need a copy of Flash 8 so you can work with the External API. Download the source files for the tutorial from the blue Properties box that contains the article PDF. There’s a heading titled Code Download and you can click the Details link next to it to get the zip file. The download includes the starter files you’ll need as well as the completed files.

Note: If you have difficulties downloading the source files or PDF, you might have a problem with your cookies. Delete the cookies from your machine and try again. In Internet Explorer, you can do this by choosing Tools > Internet Options... and clicking the Delete Cookies... button on the General tab.

As we’ll focus on Web browser communication in this tutorial, we’d better find out which browsers support the External API and how the Flash Player 8 security model has changed.

Read More
Christmas eCard, part I - Composing

Falling behind with your Christmas cards routine? Afraid your cards won’t make it in time through the jam-packed Post Office? No worries! After all it is 21st century – the time of tiny cell phones and electronic mail as our main communication tools.  So why not an eCard? Get creative with your digital camera and put together something fancy in a matter of minutes.

That’s what we’ll build in this two-part series – an eCard card application, and we we’ll do it in Flash.

You will be able to use it for yourself or, to attract more traffic, offer it to your web site visitors as a free service.

A user will be able to pick an e-Card from the available selection, change the text and the color of the greeting and type the message. The recipient will receive an email with the link to the page where this personalized card can be viewed. To accommodate for this features we will build an image browser and a color picker widget.

Read More

Uploading and downloading files with Flash 8

One of the great new features of Flash is its ability to let you work with file uploads and downloads. However, let me say right at the beginning of this article that Flash 8 CAN’T upload files on its own - it needs some help from the server. The topic of this article is how we can use Flash to communicate the information about uploaded and downloaded files with the server.

On HTML pages, one of the form controls that is included is an input control with a type of File.

<input type="file" />

This creates a field with a Browse button that looks something like the image shown below.  

You can download the files referred to in the tutorial from the blue Properties box that contains the article PDF. There's a heading titled Code Download and you can click the Details link next to it to get the zip file.

Note: If you have difficulties downloading the source files or PDF, you might have a problem with your cookies. Delete the cookies from your machine and try again. In Internet Explorer, you can do this by choosing Tools > Internet Options… and clicking the Delete Cookies… button on the General tab.

This article is part of the new interactive e-book; Out of my mind: Flash 8 Power
Read More

Working with Bitmaps in Flash 8 - part 2

If you completed part 1 of this article series, you’ll have learned about the BitmapData class. I showed you how to create a BitmapData object and we worked with it in different ways: displaying it within a movie clip, creating noise and using floodFill. Remember, that the Flash Player doesn’t redraw bitmaps each frame as it does with vector images.

In this article I’ll look at:

  • Working with pixels
  • Using the draw method
  • Applying filters to BitmapData objects

We’ll work with several examples and even create a simple application that samples colours from a photo. You’ll need to have completed part 1 of the article before you tackle part 2 as it explains a lot of the background behind the code we’ll be using here. Note that there are other methods of the BitmapData object that I won’t cover in either of the two articles.

You’ll need a copy of Flash 8 to work through this article. You can download a trial copy from the Macromedia Web site. Note that the code samples within the article all use AS2.0.

You can download the files referred to in the tutorial from the blue Properties box that contains the article PDF. There's a heading titled Code Download and you can click the Details link next to it to get the zip file.

Note: If you have difficulties downloading the source files or PDF, you might have a problem with your cookies. Delete the cookies from your machine and try again. In Internet Explorer, you can do this by choosing Tools > Internet Options… and clicking the Delete Cookies… button on the General tab.

We’ll start by looking at how you can work with individual pixels.

This article is part of the new interactive e-book; Out of my mind: Flash 8 Power

Read More

Working with Bitmaps in Flash 8 - part 1

Flash 8 includes a new class: flash.display.BitmapData that lets you work with bitmap information.  When you work with bitmaps in Flash, the Flash Player doesn’t have to redraw the image each frame so there’s less overhead.

You can create bitmaps using ActionScript, add colours, apply filters and apply many types of manipulations. You can also use a BitmapData object to fill a movie clip. You may have seen this in an earlier example.

This is the first of two articles about the BitmapData class. In this article I’ll look at:

  • creating a BitmapData object
  • attaching a BitmapData object to a movie clip
  • creating noise in a BitmapData object
  • modifying a BitmapData object

In the examples, I’ll show you how to create realistic looking TV static and you’ll also learn how to create repeating patterns in a BitmapData object. Our final example will show you how to fill a movie clip with colour like you would with the in Paint Bucket tool.

Part 2 of this article will show you some more tricks with the BitmapData class including:

  • Working with individual pixels
  • Using the draw method to turn a movie clip into a bitmap
  • Applying filters to BitmapData objects

You’ll need a copy of Flash 8 to work through this article as well as the Flash 8 Player. You can download a trial copy from the Macromedia Web site. Note that the code samples within the article all use AS2.0.

You can download the files referred to in the tutorial from the blue Properties box that contains the article PDF. There's a heading titled Code Download and you can click the Details link next to it to get the zip file.

Note: If you have difficulties downloading the source files or PDF, you might have a problem with your cookies. Delete the cookies from your machine and try again. In Internet Explorer, you can do this by choosing Tools > Internet Options… and clicking the Delete Cookies… button on the General tab.

This article is part of the new interactive e-book; Out of my mind: Flash 8 Power

Read More

Flash 8 Image Uploader

Introduction

Flash 8 has arrived on the scene with a rich array of long-awaited additions.
In this article we will be covering one of them – the File Upload feature.
We won’t be spending much of our time on theory, which you can learn by going through Flash Help.
Instead we will focus on the practical application by building a full-featured image uploader.

Features of the application include:

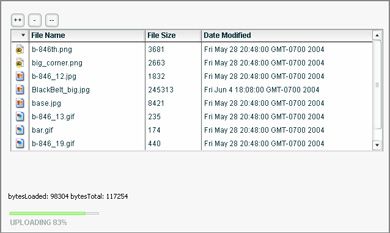
  • Upload list management: adding and remove collections of items in a datagrid with all the file relevant information.
  • Limit not only file types but also the collection’s total file size – a user will not be able to start uploading if it exceeds the limit. Once the list is compiled the user will click the Upload button to initiate the procedure.
  • During the procedure the user will be able to monitor the progress (represented by the progress bar). The user will also be notified about the upload status and errors:

    A one line of PHP code will handle the upload on the back end.

Read More

Building a bar chart in Flash, part 1

I get a lot of queries from people about how to create charts in Flash. Flash MX shipped with some chart components and there are a number of commercial products available that can help you make charts. However, if you need to make a simple chart, you can quite easily write your own. That’s the topic for this tutorial.

In this tutorial, I’ll show you how to create your own reusable BarChart class. We’ll draw the axes and bars with the drawing API. We’ll allow users of the class to create it with default values and labels or set their own. We’ll also allow people to add their own title and bar colour. If you’re not familiar with the drawing API, I won’t cover it in detail here so if you need a refresher, check out the Drawing with Flash article.

Note: If you have difficulties downloading the source files or PDF, you might have a problem with your cookies. Delete the cookies from your machine and try again. In Internet Explorer, you can do this by choosing Tools > Internet Options… and clicking the Delete Cookies… button on the General tab.

Read More

Scripting blend modes

Flash Professional 8 includes a range of blend modes similar to those in Fireworks or Photoshop. Blends allow you to change the colour of overlapping objects to achieve different visual effects. The resulting colour depends on the colours of the objects and the blend mode you choose.

Flash Professional 8 includes the following blend modes: Normal, Layer, Darken, Multiply, Lighten, Screen, Overlay, Hard light, Add, Subtract, Difference, Invert, Alpha and Erase. In this article, you’ll find out more about these blend modes and learn how to work with them in ActionScript.

You’ll need a copy of Flash Professional 8 to see the features covered in this article. You can download a trial copy from the Macromedia Web site. You should also install Flash Player 8. Because the article includes changes to ActionScript, you can’t publish the code to Flash Player 7 and earlier. Note that the code samples within the article all use AS2.0.

You can download the files referred to in the tutorial from the blue Properties box that contains the article PDF. There's a heading titled Code Download and you can click the Details link next to it to get the zip file.

Note: If you have difficulties downloading the source files or PDF, you might have a problem with your cookies. Delete the cookies from your machine and try again. In Internet Explorer, you can do this by choosing Tools > Internet Options… and clicking the Delete Cookies… button on the General tab.

This article is part of the new interactive e-book; Out of my mind: Flash 8 Power

Let’s get started by looking at what each blend mode does.

Read More

Scripting filters, part 2

In part one of the Scripting filters in Flash Professional 8 series, I showed you how to use ActionScript to work with filters. We covered how to add, modify and delete filters. I also covered the Bevel and Blur filters in detail and gave you an example of how to use each one.

In this article, I want to cover the remaining filters included in Flash Professional 8.  We’ll look at the following filters.

  • ColorMatrix
  • Convolution
  • DisplacementMap
  • DropShadow
  • Glow
  • Gradient Glow
  • Gradient Bevel

We’ll see examples of how to work with these filters. We’ll work through a couple of examples so you can see some uses. You’ll need a copy of Flash Professional 8 and Flash Player 8 to work through this article. You can download a trial copy from the Macromedia Web site. Note that the code samples within the article all use AS2.0.

You can download the files referred to in the tutorial from the blue Properties box that contains the article PDF. There's a heading titled Code Download and you can click the Details link next to it to get the zip file.

Note: If you have difficulties downloading the source files or PDF, you might have a problem with your cookies. Delete the cookies from your machine and try again. In Internet Explorer, you can do this by choosing Tools > Internet Options… and clicking the Delete Cookies… button on the General tab.

We’ll start by looking at the ActionScript only filters - the ColorMatrix, Convolution and DisplacementMap filters. These are advanced filters that contain complicated calculations.

This article is part of the new interactive e-book; Out of my mind: Flash 8 Power

Read More

Scripting Filters, part 1

If you’ve been reading the articles about the new features in Flash 8, you’ll know that Flash Professional 8 includes a range of filters that allow you to add special effects to objects on the Stage. In an earlier article, I showed you how to apply the following filters using the Flash interface:

  • Bevel
  • Blur
  • DropShadow
  • Glow
  • Gradient Glow
  • Gradient Bevel

You can also use ActionScript to work with these filters. In addition, you get to work with the extra filters listed below when you use ActionScript:

  • Convolution
  • ColorMatrix
  • DisplacementMap

This article is part of the new interactive e-book; Out of my mind: Flash 8 Power

These are more advanced filters than the first group and involve complicated calculations. I’ll give you information about them but you might want to start scripting with the other filters in ActionScript first.

In this article, I’ll start by covering some background about how to work with filters in ActionScript. We’ll look at the Bevel and Blur filters and create a motion effect. In the next article, I’ll look at the other filters and we’ll create a small application that allows you to adjust a Drop Shadow filter dynamically.

You’ll need a copy of Flash Professional 8 to see the features covered in this article. You can download a trial copy from the Macromedia Web site. You should also install Flash Player 8. Note that the code samples within the article all use AS2.0.

You can download the files referred to in the tutorial from the blue Properties box that contains the article PDF. There's a heading titled Code Download and you can click the Details link next to it to get the zip file.

Note: If you have difficulties downloading the source files or PDF, you might have a problem with your cookies. Delete the cookies from your machine and try again. In Internet Explorer, you can do this by choosing Tools > Internet Options… and clicking the Delete Cookies… button on the General tab.

Read More

Producing Excel reports from Flash

Every new version of Flash comes with a train and a little wagon of nice new features.
Despite all the improvements there are still a few things in Flash technology that aren’t just there, and generating professionally looking printable reports is one of them.  Printing dynamic (data-driven) content from Flash has always been a difficult task. No doubt that the PrintJob class that’s been added to the application API in version 7 has been a huge improvement, yet it hasn’t solved all the problems.
While Flash is very good for printing high resolution graphics (because of its native support for vector graphic format) some tasks that are considered basic in browser environment are very difficult to achieve.

Read More

Working with Text in Flash 8 ActionScript

In this article, I’m going to look at some of the new text features that are available using ActionScript in Flash 8. If you have read some of the earlier articles, you’ll have seen that Flash 8 includes some improved text options.

This article is part of the new interactive e-book; Out of my mind: Flash 8 Power

Flash 8 uses FlashType - a new text rendering engine. It provides high-quality text rendering, especially at small font sizes so that the appearance of text is improved in Flash Player 8. FlashType can’t be used with earlier Flash Players but it is automatically selected when you publish to the Flash 8 player.  Flash 8 also includes other options for working with text including new ActionScript properties for the TextFormat class and new anti-aliasing settings.

Read More
Newer articles Older articles