Create dazzling multimedia presentations, slideshows and banners with Active Slideshow Pro. This extension builds on the success of Active Slideshow and gives you new spectacular effects and optimal control over your slides, texts, transitions and sounds.
Active Slideshow Pro is completely rebuild and packed with new features. Among the features are amazing transition effects. Easing will give you full motion control on your transitions. And you can spice up your slideshow with time triggered texts and sound effects per slide.
The zoom and pan effects of Ken Burns are fully controllable. The Ken Burns effect can be combined with other transition effects. The flow of the effects can be controlled with easing and allows effects like accelerated and elastic movements. A new interface in Dreamweaver gives you full control of all the options.
Demos
Flash Tutorials
Get it now>>


Creating the Slideshow
Before you start, define your site in
Dreamweaver. This
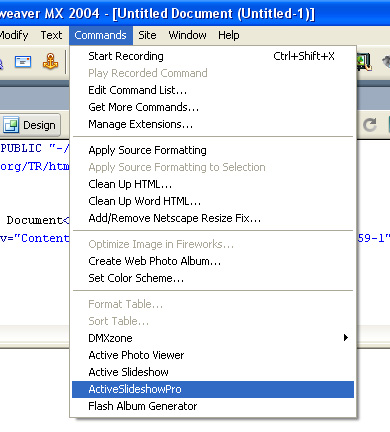
page shows you how to define your site. Start the extension by clicking on
the Commands menu in Dreamweaver and choosing the Active Slideshow option.
Or by pressing the  icon in the DMXzone object
pallet.

A new dialog will appear; we'll start by
filling in the General Options. These options apply to the whole slideshow.

First we'll fill in the Name that is
used for the slideshow. Then we determine if we want to force the use of the
Flash 8 Player or not by enabling or disabling the Always Use Flash Player 8 checkbox. Enabling the Always Use Flash Player 8 checkbox automatically
updates the Flash viewer to version 8. If you use overlays with Flash 8
functionality you need to enable this option, the supplied overlays don't use
Flash 8 versions. It also includes an auto update feature that downloads the
Flash 8 player for users that haven't installed it yet.
After that we can select the Overlay of the slideshow. The overlay can be used to create a border around your
slideshow or a new effect. If you use an overlay it might be necessary to
change the position of your texts as the effect might overlap them. You can
either select a supplied overlay by using the dropdown or use your own
overlay by pressing the Browse button. Overlays are .swf files that can
be created with Macromedia Flash. You need to enter the exact Width and Heigth of the overlay movie. All of the supplied overlays have a Width of 550px
and a Height of 400px.
After that you can change the Background
Color the default Background Color is white. You can use the Text Margin option to specify the room between your text and the borders of the
slideshow. If you use an overlay, make sure your Text Margin is large
enough to ensure that the text isn't overlapped by the overlay.
Check the Loop Slideshow if you want
to repeat the Slideshow from the beginning after it's completed. Stream
Slideshow option determines if the player should play your content
(images&music) while loading data or that it should wait until all data is
loaded (when unchecked).
Lets fill in the Interactivity options.

The interactivity options enable you to
place a link on your slideshow. The On Click option enables you to refer
to a link after the user has clicked on the slideshow. The At the End Go To option
enables you to go to a link after the slideshow is finished. Note: This
option is only enabled when the Loop Slideshow option is disabled. You
can choose the file that you want to link to by selecting the Browse… button.
You can choose the target in the dropdown behind the Browse… button.
We'll have a look at the sound options;

Lets set the Background Music;
attach an mp3 file by pressing the browse button and selecting the
location of your mp3. After that you can set the Volume of the
sound and specify if the sound should be looped or not by selecting the Repeat checkbox. If you want to enable to play music while still loading data
check the Streaming checkbox. Enable or disable the Mute Button to
allow your users to turn of the sound or not by pressing a speaker button. You
can customize the color of the speaker with the Color property.
Lets fill in the Watermark Text options;

The Text field enables you to place
a text that is visible within all Slides. The Position drop list enables
you to place the text at the desired location. The Size sets the Font
Size. You can use the Margin option to specify the room between your
watermark and the borders of the slideshow. If you use an overlay, make sure
your Margin is large enough to ensure that the text isn't overlapped by
the overlay. Alpha determines the transparency of the text (where 0% is
fully transparent), note that this option only works with the Arial Bold font as this font is embedded in the SWF file. The Angle determines the
rotation of the text; you can enter any value between 0 and 360. With the Font option you can select the desired font. You can set the text color with the Color field. Use the Size option to determine the size of your
fonts in pixels. You can change the Color of the font by using the color
picker. You can markup the text using the Bold or Italic icons
and you can align the text left, center or right using the paragraph icons.

The Preloader Color adjusts the
color of the bar that is displayed while loading, the default Preloader Color
is light blue. The Preloader Border Color adjust the color of the line
around the loader, the default color is grey.
The default Preloader Title shows
the text "Preloaded" and is followed by the percentage of the movie that is
loaded. The title can be changed by changing the default title in the entry
box.
Lets go to the next tab and fill in the
options in the Slides tab.

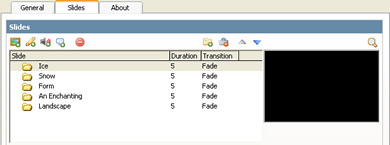
Use the Add Folder button  to
select a set of images to use for your slides, note that this folder must be nested in your defined site. You can remove all Slides by pressing the Clear
All button
 . To add a single slide press
the Add Slide button
  .
.
The cursor
automatically goes to the Slide Field after pressing the  button.
Here you can enter the options of the slide, well discuss these options later
on. Press the delete button
  to remove a slide and the up and down arrows to select the slides you want to edit. There is a
display menu below these buttons that lists the slides, the total duration and
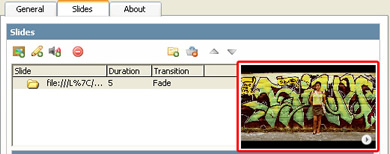
the transition that is used on the slide. On the right there is a preview that enables you to view the effects and the image that you've configured.
Let's press on
the Add Slide button  and fill in the Select Slide
options.

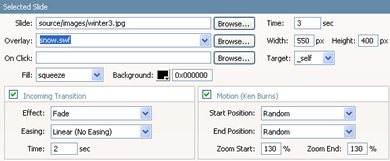
Press the Browse button next to the Slide field to specify the image to be used for the slide. Leave this field empty if
you don't want to display an image but for instance only a text, or a sound effect. Enter the Time field to determine how many seconds the slide must be
displayed (excluding the effect time that will be specified later on).
After that we can select the Overlay of the slide. The overlay can be used to create a border around your slide or a
new effect. If you use an overlay it might be necessary to change the position
of your texts as the effect might overlap them. You can either select a
supplied overlay by using the dropdown or use your own overlay by
pressing the Browse button. Overlays are .swf files that can be created
with Macromedia Flash. You need to enter the exact Width and Heigth of the overlay movie. All of the supplied overlays have a Width of 550px
and a Height of 400px.
Enter the On Click option to specify
a target link that the user will visit after pressing the selected slide (this
overrules the general On Click feature that we talked about earlier). Specify
the Target to select the target window of the slide; you can select the
default targets that are used in html (such as _self, _blank, _parent, _top).
Enter the Fill option if you don't want a Motion or Transition effect
but you do want to fit an image within the window. You can select from center, stretch, squeeze and trim;
- Center lets you center the image in the slide without resizing the image.
- Stretch fills the image across the entire slide; this might change the
image Proportions.
- Squeeze resizes the image maintaining the original Proportions. This will
make the whole image visible within the slide. Note that the image has
borders if the image Proportions are different then the slide.
- Trim resizes
the image, maintaining the original Proportions. The image will fill the
whole slide and might not show whole image.
The background option sets the background colour of the slide.
Check the Incoming Transition checkbox
if you want to enable an effect at the start of the slide. First choose the Effect,
you can choose from;
Fade increases
the alpha of the current slide to let it fade in.
Slide In moves
the current slide in from the selected direction and overlaps the previous
slide.
Slide Out moves
the previous slide out to the selected direction and overlaps the previous
slide.
Push moves
the slide in from the selected direction and pushes the previous slide away.
Easing enables special movement effects on your transition such as elastic movement,
acceleration or
de-acceleration, you can choose from;
- Linear (No Easing)
- InOutCubic
- InOutQuintic
- InQuintic
- InQuartic
- InCubic
- InQuadratic
- OutQuintic
- OutQuartic
- OutCubic
- OutInCubic
- OutInQuartic
- BackInCubic
- BackInQuartic
- OutBackCubic
- OutBackQuartic
- OutElasticSmall
- OutElasticBig
- InElasticSmall
- InElasticBig
As the influence of the motion of these
easing effects is hard to describe feel free to experiment with them.
Set the Time to specify the duration
of the Incoming Transition.
Check the Motion (Ken Burns) effect
to enable the zoom and pan effect of the famous director Ken Burns or to
specify other zoom and pan options. To apply the original Ken Burns effect,
leave the Start Position and the End Position at Random. And
set the Zoom Start and Zoom End to 0% (or another value below
100%). Other options enable you to slide in from and to any direction by
setting the Zoom Start and Zoom End options. You can check the interactive preview by clicking on it. The preview enables you to view the effects
and the image that you've configured in the top right of the Slides menu.

Lets select a slide that we want to add
text to and press the Add Text button  in the Slides Menu to
add some text to our slides;

A new text icon appears below the folder
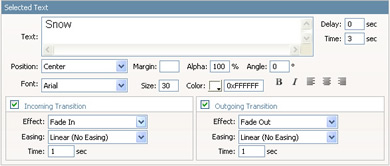
icon (which represents a slide). After you've pressed the Add Text button  a new Selected Text menu
appears below the Slides menu.

The Text field enables you to place
a text that is visible within the selected Slide. The Position drop
list enables you to place the text at the desired location. The Delay field
determines how long it takes before the Text is displayed. The Time field
specifies how long the text will be displayed (excluding the Transition times
below). Font option you can select the desired font. The Size sets the Font Size. Color sets the text color. With the You can set the
text color with the Color field. You can markup the text using the Bold or Italic icons and you can align the text left, center or right using the paragraph icons. Alpha determines the
transparency of the text (where 0% is fully transparent), note that this option
only works with the Arial Bold font as this font is embedded in the SWF
file. The Angle determines the rotation of the text; you can enter any
value between 0 and 360. Check that the total duration of your slides that is
listed in the Slides window leaves enough time to display the text
slides.
Ok now let's specify the transitions. Check
the Incoming Transition checkbox to use a transition at the start of the
slide. You can choose from the following effects;
- Fade In increases the alpha of the current text to let it fade in (only works with
the embedded Arial Bold font).
- Zoom In magnifies the text
- Blow In zooms
out from a scaled up version of the text to a smaller version (similar to
a falling text effect).
Easing enables special movement effects on your transition, you can choose
from;
- Linear (No Easing)
- InOutCubic
- InOutQuintic
- InQuintic
- InQuartic
- InCubic
- InQuadratic
- OutQuintic
- OutQuartic
- OutCubic
- OutInCubic
- OutInQuartic
- BackInCubic
- BackInQuartic
- OutBackCubic
- OutBackQuartic
- OutElasticSmall
- OutElasticBig
- InElasticSmall
- InElasticBig
As the influence of the motion of these
easing effects is hard to describe feel free to experiment with them.
Time sets
the duration of the text.
The Outgoing Transition has similar
fields for specifying the outgoing transition the only thing that differs are
the names of the effects (they end with "out" instead of "in").
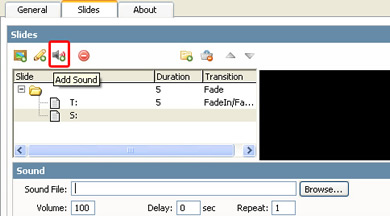
Lets add a short music track or sound
effect to our slide by pressing the Add Sound button 

A new text icon appears below the folder
icon (which represents a slide). After you've pressed the Add Sound button  a new Sound menu
appears below the Slides menu.

Lets set the Sound File; attach an mp3
file by pressing the browse button and selecting the location of your mp3. After that you can set the Volume of the sound and specify if the Delay (the time that it takes before the sound is played). By setting the Repeat option
you can determine if the sound should be played once or if the sound should be
looped. The sound files play until they are completed and are slide
independent.


