Overview
Introduction:
In our everyday work, it is very hard to meet with everyone in person because of our busy schedules. To resolve this problem, E-mails helped us a lot to communicate with our clients, friends, colleagues etc. Now millions of people are using emails and can’t live without them. It would be great for all webmasters to have an application that will let them send audio/video messages to their clients and friends. Further more, it will also enhance your reputation as a person/company who is using the current trends of technology &communication.
In this article, we are going to make an audio/video messaging application that will allow you to send audio/video email messages to anyone in the world. The problem is that many users use email clients that do not support multimedia contents other then simple images.
The main benefit of your application is that it will store all messages on your server and won’t send those messages as attachments. Instead a link to the message will be send to the receiver so that he can easily watch & listen to your message. In addition to this, neither sender, nor receiver has to download any plug-in or software to receive the message as the entire message will be broadcast using Macromedia Flash Player that is already installed on almost all the computers that are connected to internet. According to News.com’s survey report, Macromedia Flash Player is installed on 98% of computers that are connected to internet.


Setting up the application directory under flash communication server:
For windows users, browse to:
C:\Program Files\Macromedia\Flash Communication Server MX\applications\
Where C:\ is your windows installation directory, under this "applications" folder, create a new folder and rename it to "avMessages". This is all that you needed to connect to your flashcom server’s applications.
Creating the User interface of your application:
If you have downloaded the sample files, then there must be two folders:
1) Files_Raw
2) Files_Completed
Open the Files_Raw folder & open the "MessageSender.fla"
This file consists of four layers named Base, Contents, AS & global respectively. The base layer will be locked & containing a grey-white colored rectangle as the base of your message application (as shown in figure below). You can change the rectangle as you like.
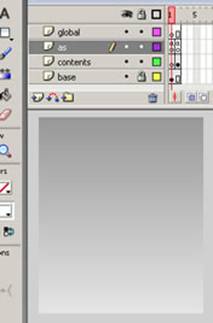
The base layer will just hold the background graphics of our application. The contents layer will hold the GUI elements of the application, The AS layer will consist only the frame related actions & the Global layer will hold the actions that are consistent through out the application. Initially, both the frames (frame 1 & 2) of AS layer will consist only simple stop(); action.
Select the contents layer, create an input textfield using the text tool from the tool box & set the properties of this input textfield as shown in figure below.
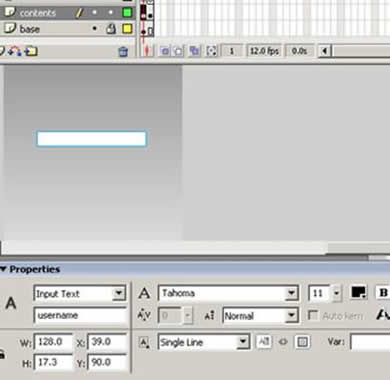
Properties of newly created Input Textfields. Name: username , width:128, height:17, font: Tahoma.
Now launch the component panel if not already opened by pressing (CTRL+F7) & with Content Layer still selected, drag an instance of button component on the stage & set its properties as shown below:
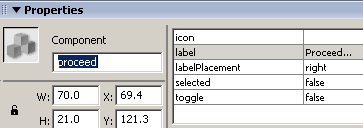 Properties of button component.
Now with Select the FRAME 2 of Content Layer, Open up the library panel by pressing F11 (if not already opened). Click on the top right corner of library panel, from the dropdown menu, choose New video. This will add an embedded video symbol to your library. While the content layer still selected & being on frame 2 of that layer, drag an instance of the newly added video object to stage and set its properties as shown below:
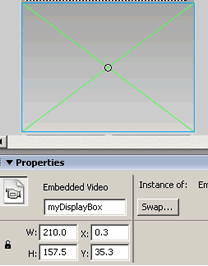 Properties of Video object.
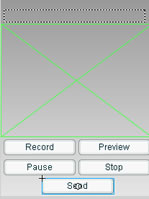
While frame 2 of content layer still selected, drag five instances of Button component on stage & set their properties as:
Select first button, in property inspector, add these values:
Name: Record_btn
X: 4.0
Y: 196
Width: 100
Height: 22
Label: Record
Select the second button, add these values in property inspector.
Name: Play_btn
X: 108
Y: 196
Width: 100
Height: 22
Label: Preview
Select the third button, add these values in property inspector.
Name: Pause_btn
X: 4.0
Y: 224
Width: 100
Height: 22
Label: Pause
Select the fourth button, add these values in property inspector.
Name: Stop_btn
X: 108
Y: 224
Width: 100
Height: 22
Label: Stop
Select fifth button, in property inspector, add these values:
Name: Send_btn
X: 57
Y: 250
Width: 100
Height: 22
Label: Send
Create a dynamic textfield and set its properties as:
Name: welcome
X: 196
Y: 17
Width: 200
Height: 17
Font: Tahoma 11 Bold Black
Here is a screenshot of the basic interface for sending and recording your movies:
Please save your movie. This concludes the interface creation part of your application; now proceed to next part, where we will write some actionscript for the application that enables the receiver to view the movies.