I had the
problem while browsing through my image folders, i couldn't find the imagename
i was looking for or just made a guess which one it was. Of course you
can right-click the file and select "Example", but this feature
doesn't within your application with the use of some Javascript.
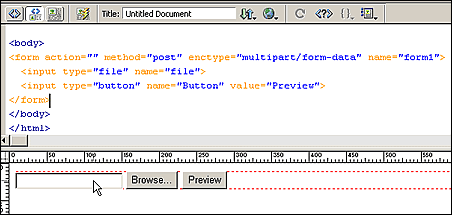
First of all we create
a form with a file field and a button named "Preview". See example
below:
Next place your cursor
in the head of your document (codeview) and use your script button  to insert a Javascript.
Place the
following script in the content box and add it to your document:
<script language="JavaScript"
type="text/JavaScript">
function previewImage(fileInfo) {
var filename =
"";
if (fileInfo ==
null) {
if (document.form1.file
!= "")
{
filename = "file:///"
+ document.form1.file.value;
}
} else
{
filename = fileInfo;
}
if (filename ==
"") {
alert ("Please select a image.");
document.form1.file.focus();
} else
{
popup = window.open('',
'imagePreview',
)width=600,height=450,left=100,top=75,
screenX=100,screenY=75,scrollbars,location,menubar,status,toolbar,resizable=1');
popup.document.writeln("<html><body
bgcolor='#FFFFFF'>");
var fileExtension =
filename.substring(filename.lastIndexOf(".")+1);
if (fileExtension ==
"jpg" ||
fileExtension ==
"jpeg" ||
fileExtension ==
"gif"
|| fileExtension ==
"png")
popup.document.writeln("<img
src='" + filename +
"'>");
else
popup.document.writeln("<a
href='" + filename +
"'>" +
filename + "</a>");
popup.document.writeln("</body></html>");
popup.document.close();
popup.focus();
}
}
</script>
Now attach
the function (onClick event) to your "Preview" button:
<INPUT
TYPE="button"
NAME="Button"
VALUE="Preview"
ONCLICK="previewImage(document.form1.file.value)">
Your form looks like
this now:
<FORM ACTION="" METHOD="post" ENCTYPE="multipart/form-data" NAME="form1">
<INPUT TYPE="file" NAME="file">
<INPUT TYPE="button"
NAME="Button"
VALUE="Preview"
ONCLICK="previewImage(document.form1.file.value)">
</FORM>
That's it !
|
 Marcellino Bommezijn is one of the managers at dmxzone.com. He is a contributor on the tutorials section.
Comments
Useful but limited
Ooops
I take it all back! All I had to do was change the file in the on click Event
Sorry
Setting the Titel fot the pop-up page
How can set the titel for the pop-up page instead of URL form the previous page it is now using?
RE: Setting the Titel fot the pop-up page
You must me logged in to write a comment.